This is the seventh post in my Art Room Project series. Find the Table of Contents at the first post, Getting Started.
Scratch the Surface
Now we are getting to some fun stuff: creating the desk top. This is the surface where I'll work, cut, paint, glue, scrape, bleed, etc. The issue, which I had not addressed until I got to this point, was what material to use for the top? It didn't seem important until now.
Top Type
During the design, I assumed it would be a Formica or other laminate top--maybe a pre-built one from the hardware stores and cut to fit. As I built the cabinets, this didn't feel right. I had all this custom work, only to drop in a kitchen top? So I talked to Teresa about my ideas. Maybe I should just make an oak top. I could even do end grain up, like a cutting board, so it would be tough and easy to sand and fix.

Saturday, January 22, 2011
Saturday, January 8, 2011
Art Room Project - Lower Desk
This is the sixth post in my Art Room Project. Find the Table of Contents at the first post, Getting Started.
Work on the Work Area
Time to focus on the work area. I built the trash cabinet first. This holds up the lower desk on the left.
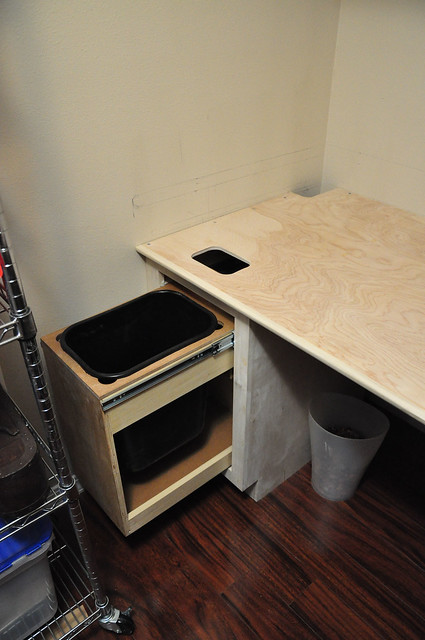 Trash Cabinet
Having a trash can in a cabinet is nothing new. I looked at many pre-built options, but realized it is just a drawer turned upside down. Cut a hole for the bin, add some structure to the bottom and we have a good solution.
I used 100 lb rated drawer slides. If I'm throwing away more than 100 lbs in this little trash can, I have bigger issues than the drawer slide rating.
Here you can also see the lower desk installed. I cut a small hole so trash can be pushed in without needing to open the drawer.
Work on the Work Area
Time to focus on the work area. I built the trash cabinet first. This holds up the lower desk on the left.
Having a trash can in a cabinet is nothing new. I looked at many pre-built options, but realized it is just a drawer turned upside down. Cut a hole for the bin, add some structure to the bottom and we have a good solution.
I used 100 lb rated drawer slides. If I'm throwing away more than 100 lbs in this little trash can, I have bigger issues than the drawer slide rating.
Here you can also see the lower desk installed. I cut a small hole so trash can be pushed in without needing to open the drawer.
Subscribe to:
Posts (Atom)